To make coffee in your CV1 Coffee Maker, start by filling the water reservoir to the desired level. Place your coffee cup under the brew basket. Insert the brew basket, add a disposable filter, and then evenly distribute coffee grounds. Pour water accurately to avoid spills and achieve an ideal extraction. Confirm your cup is stable and press the start button to begin brewing. Once the process completes, you can improve your coffee with milk or sugar as you like. For a richer experience and more detailed tips, there's plenty more to explore.
Main Points
- Fill the reservoir with water up to the 10-ounce capacity mark.
- Place the brew basket securely in its slot with a disposable filter and coffee grounds.
- Position your coffee cup directly under the brew basket to avoid spills.
- Press the start button to begin the brewing process.
- Enjoy your freshly brewed coffee by adding milk, sugar, or flavored syrups as desired.
Preparing the Coffee Maker
To get started, fill the reservoir of the CV1 coffee maker with water up to the desired level. This step is important for achieving the coffee strength you prefer. The water level indicators guide you, guaranteeing the perfect brew every time. Once the reservoir is filled, you're set to move forward.
Next, make sure your coffee cup is in place. Position it directly under the brew basket area to catch the freshly brewed coffee. This step is often overlooked, but it's necessary to avoid spills and make sure your cup is ready to receive the coffee the moment it's brewed.
Now, it's time to power up the CV1 coffee maker. Press the start button to begin the brewing process. The machine will start to heat the water and pass it through the coffee grounds, creating that rich, aromatic brew you're aiming for. Keep an eye on the brewing light indicator; it will signal when your coffee is ready.
Once the brewing light indicates completion, carefully remove your cup, making sure you don't spill any coffee. Enjoy your perfectly brewed cup of coffee, crafted with precision and care. With these steps, you'll master the art of using the CV1 coffee maker.
Inserting the Brew Basket
To get started, make sure you properly place the brew basket into its designated slot in the coffee maker.
Then, add the disposable filter and coffee grounds to the basket, ensuring they're secure.
This step is essential for a smooth brewing process and a great cup of coffee.
Proper Basket Placement
Begin by securely inserting the disposable brew basket into its designated slot in the CV1 coffee maker. Proper basket placement is important to prevent spills or leaks during the brewing process. The brew basket is designed to hold the coffee filter pack, which contains the coffee grounds.
To achieve proper basket placement, follow these steps:
- Align the Basket Correctly: Make sure that the edges of the brew basket align perfectly with the grooves in the coffee maker. This alignment is essential to prevent any mishaps and ensures a smooth brewing cycle.
- Push Until It Clicks: Gently push the brew basket into the slot until you hear a slight click. This sound indicates that the basket is securely in place. If you don't hear a click, double-check the alignment and try again.
- Check Stability: Once inserted, give the brew basket a gentle tug to confirm it's firmly seated. A stable brew basket ensures that the coffee filter pack will function correctly, resulting in a superior cup of coffee.
Mastering these steps not only improves your brewing experience but also guarantees that your CV1 coffee maker operates efficiently. Following the manufacturer's instructions for proper basket placement will help you get the most out of your coffee-making journey.
Filter and Grounds
With the brew basket securely in place, it's time to insert the coffee filter pack and grounds for a perfect brew. Start by selecting the recommended coffee filter pack size for your CV1 coffee maker. This guarantees you avoid overflow or clogging, which can disrupt the brewing process. Once you have your filter pack, place it into the brew basket, making sure it sits evenly and covers the bottom fully.
Next, add the coffee grounds. Measure the correct amount based on your desired coffee strength and the capacity of your CV1 coffee maker. Pour the grounds into the filter, ensuring they're distributed evenly. This helps in achieving a consistent extraction and a balanced flavor profile.
Double-check that the brew basket is firmly inserted into the machine. A secure fit is essential to prevent any leaks during the brewing cycle. If the basket isn't properly in place, you might end up with a kitchen mess instead of a delicious cup of coffee.
When everything is set, close the lid of the brew basket compartment. You're now ready to proceed with the next steps of your coffee-making process.
Adding Water to the Reservoir
Please make sure to fill the CV1 coffee maker's reservoir with water up to the 10-ounce capacity mark for the perfect brew. This step is important for guaranteeing that your coffee is neither too strong nor too weak.
Start by using the coffee cup that fits below the brew basket to measure the water accurately. Pour the water into the back of the coffee maker, making sure you don't exceed the maximum fill line. This prevents any overflow during the brewing process.
Adding water to the reservoir is a simple yet vital part of making a great cup of coffee. It ensures the correct amount of water is used for a single cup, guaranteeing efficient extraction of flavors from the coffee grounds.
Here's what to remember:
- Accuracy: Use the coffee cup to measure the exact amount of water.
- Prevention: Avoid exceeding the maximum fill line to prevent spills.
- Efficiency: Pour the water into the back of the machine for a seamless brewing process.
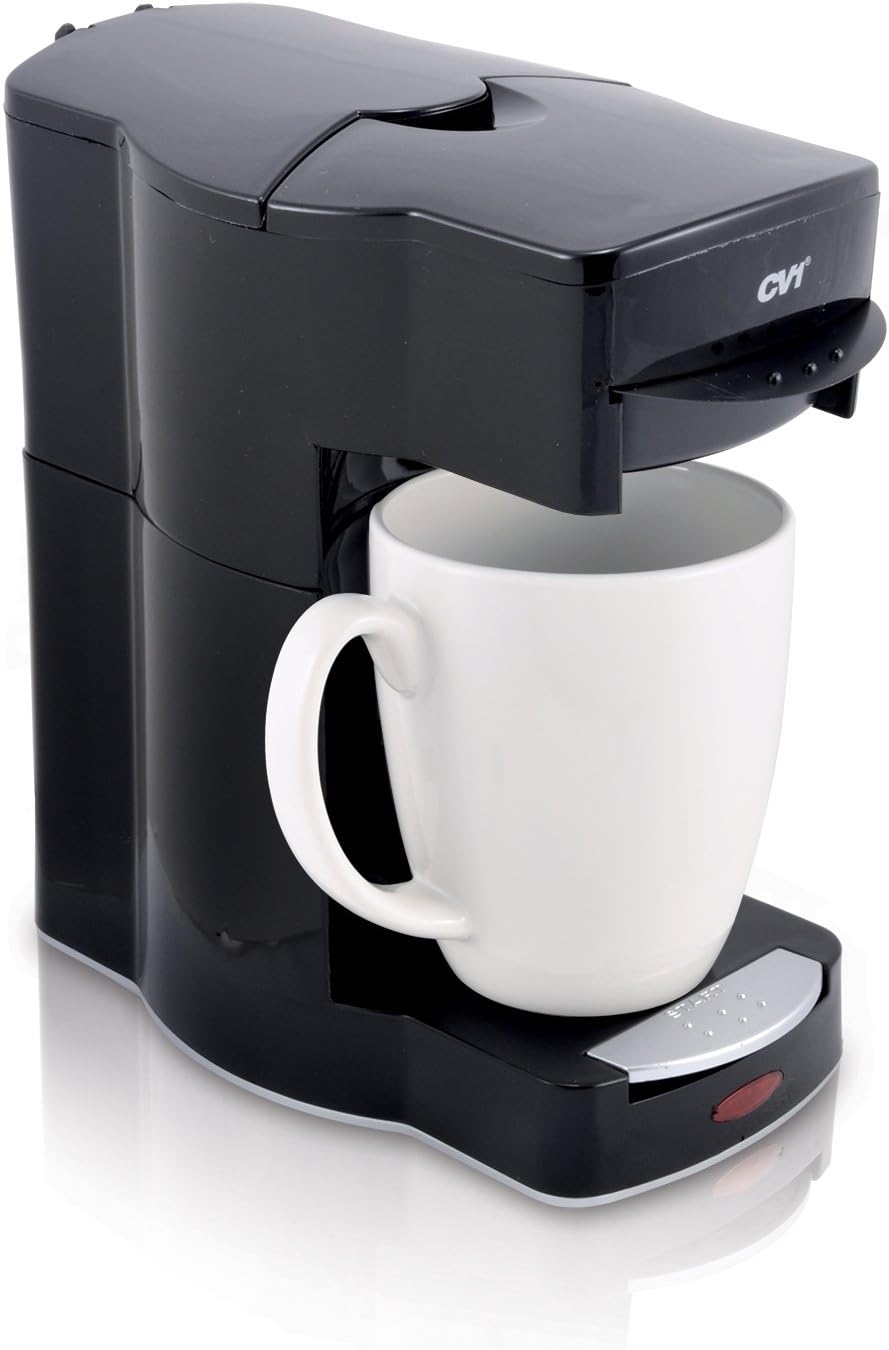
Placing the Coffee Cup
Position your coffee cup directly under the CV1 brew basket to make sure it catches the freshly brewed coffee. This step is essential for ensuring that your coffee ends up in the cup with no mess.
The CV1 Coffee Maker is designed for convenience, allowing you to brew coffee directly into your cup or mug.
First, find the designated spot for your cup under the brew basket. The machine's design includes a specific area to place your cup, ensuring it aligns perfectly to catch the 10-ounce brew.
Check that your cup fits securely and that it's stable. This prevents any accidental tipping or spillage during the brewing process.
To achieve mastery, make sure the cup is centered under the brew basket. If the cup is even slightly off, you risk spillage, wasting precious coffee and creating a mess.
Doing this right every time will streamline your coffee-making routine and keep your workspace tidy.
Starting the Brewing Process
Now that your cup is perfectly positioned, it's time to start the brewing process. Follow these steps to guarantee a smooth and efficient brewing experience.
First, make sure the water reservoir is filled to the desired level, typically 10 ounces.
Next, check that you've inserted a disposable brew basket and a coffee filter pack into the designated area. This setup guarantees that your coffee grounds are properly contained and won't make a mess.
Finally, place your coffee cup directly under the brew basket to catch the freshly brewed coffee.
To begin brewing, simply press the start button on your Cv1 coffee maker. This will initiate the brewing cycle, and you'll start to hear the machine working.
Here's a quick rundown to evoke the excitement of getting your coffee ready:
- Anticipation: Watch as the Cv1 starts brewing your coffee.
- Aroma: Experience the enticing aroma filling your kitchen.
- Satisfaction: See the coffee flowing into your cup, signaling a perfect brew!
Wait for the brewing cycle to complete, which is usually indicated by a light or sound signal.
Once finished, you're ready to move on to enjoying your freshly brewed coffee.
Enjoying Your Coffee
With your freshly brewed coffee in hand, take a moment to savor the rich aroma before taking that first delightful sip. The CV1 coffee maker guarantees that your coffee is not only easy to use but also delivers a consistently great brew. Whether you're enjoying your coffee in the comfort of your home or using it as your valet room coffee solution, the CV1 has got you covered.
To enrich your coffee experience, consider the following aspects:
| Aspect | Consideration | Tip |
|---|---|---|
| Temperature | Make sure it's not too hot or too cold | Ideal drinking temperature is around 140°F |
| Flavor | Adjust to your liking | Add milk, sugar, or flavored syrups to personalize your taste |
| Cup Choice | Use a cup that preserves heat | Ceramic or insulated travel mugs work best |
| Environment | Choose a calming setting | Enjoy your coffee in a tranquil place to fully appreciate its details |
| Pairing | Complement with a snack | Pair your coffee with pastries, fruits, or a light breakfast for a richer experience |
The CV1 coffee maker's user-friendly design makes it perfect for those who want a hassle-free coffee experience. Its simplicity doesn't compromise the quality of your brew, ensuring you can enjoy a delicious cup of coffee every time.
Frequently Asked Questions
How to Use a CV1 Machine?
To use a CV1 machine, follow brewing tips: insert a brew basket and coffee filter pack, add water, and press start. Regularly follow cleaning tips and a maintenance schedule to guarantee peak performance and longevity of your machine.
How to Make Coffee in a Coffee Maker Step by Step?
First, choose quality coffee beans and grind them to your preferred coarseness. Use the right filter type for your coffee maker. Pour water, add grounds, and start brewing. Monitor brewing time for the perfect cup.
What Is the Coffee-To-Water Ratio for a Coffee Maker?
For ideal coffee-to-water ratio, use 1:16. Different brewing methods require specific grind sizes and water temperatures. Master your brew by adjusting these variables: coarse grind for French press, medium for drip, and fine for espresso.
What Is the Coffee-To-Water Ratio for Mr Coffee Coffee Maker?
For Mr. Coffee makers, use 1-2 tablespoons of coffee per 6 ounces of water. Experiment with different coffee varieties and grinder types to adjust your brew strength and achieve your perfect cup.
Conclusion
Now that you've followed all the steps, your coffee should be ready to enjoy. Simply remove your cup from the CV1 coffee maker, and savor the fresh brew.
Clean up any spills and rinse the brew basket for the next use.
By following these straightforward instructions, you can effortlessly prepare a perfect cup of coffee each time. Enjoy the simplicity and convenience of your CV1 coffee maker, making your mornings smoother and more enjoyable.